Creating a bedroom that feels both elegant and unique can sometimes feel overwhelming. You might be craving that vintage-inspired charm that wall moulding brings, but unsure where to start. That’s why I put together this guide on 12 bedroom wall moulding ideas that will add classic detail to your space. Whether you’re a seasoned decorator or a newbie looking to refresh your home, these ideas promise to inspire and elevate your bedroom’s aesthetic.
If you’re someone who appreciates classic details and loves to bring vintage vibes into your living spaces, this post is tailored for you. You might be dreaming of a cozy retreat that reflects your personal style, or perhaps you’re just looking to add some character to your walls. Either way, you’re in the right place! I’ve gathered a variety of bedroom design ideas that range from simple DIY projects to more intricate moulding styles, ensuring you find something that suits your taste and skill level.
Get ready to discover wall moulding ideas that are elegant, timeless, and perfectly suited to create a serene bedroom atmosphere. From the understated beauty of wainscoting to eye-catching coffered ceilings, you’ll find a mix of traditional and modern elements. With these tips, you will not only improve your bedroom’s look but also add a touch of sophistication that makes your space even more inviting.
Key Takeaways
– Explore various walls moulding styles like classic crown moulding and board and batten, perfect for adding character to your bedroom.
– Discover how picture moulding can turn your walls into a gallery space, elevating your room’s decor while showcasing art.
– Learn about DIY wall moulding options that allow you to customize your bedroom style without breaking the bank.
– Understand the benefits of using wainscoting to add depth and texture, making your bedroom feel more inviting.
– Find practical tips for layering moulding designs to create a more dynamic and sophisticated look in your space.
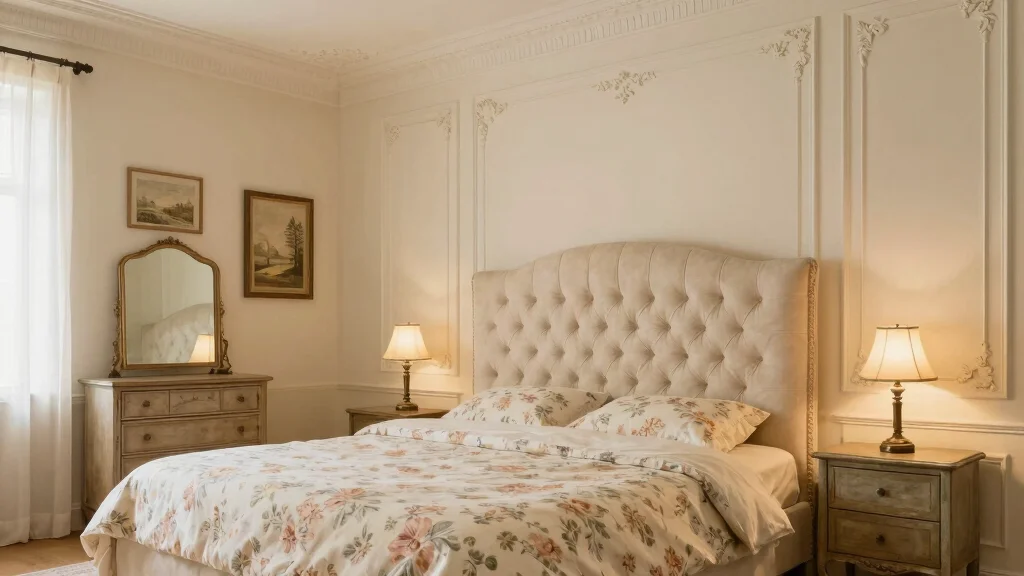
1. Classic Crown Moulding

Classic crown moulding serves as a hallmark of elegance in any bedroom. This sophisticated moulding style seamlessly connects the wall and ceiling, enhancing the room’s height and grandeur, making it an essential element of classic design. Imagine crisp white moulding framing a soft pastel ceiling, or a dark wood finish contrasting with light wall colors for an eye-catching effect. The visual harmony created by these choices adds a timeless appeal to your space, creating a welcoming and refined atmosphere.
To bring this design principle to life, consider the proportions of your room when selecting crown moulding. Larger spaces can accommodate thicker, more ornate styles, while smaller rooms benefit from simpler profiles. Painting the moulding in a color that either contrasts with or complements your walls can amplify its impact. For those who enjoy DIY projects, installing crown moulding is a rewarding task, but don’t hesitate to reach out to professionals for a flawless finish.
Consider these practical tips to enhance your crown moulding installation:
– Pair bold crown moulding with neutral wall colors for striking contrast
– Install LED lighting above the moulding for a soft glow
– Use caulk to fill gaps for a polished appearance
– Choose wider profiles for a bolder statement
This elegant touch not only elevates the aesthetic of your bedroom but also brings warmth and depth through its intricate textures and materials.
Fun fact: Classic Crown Moulding can visually boost ceiling height by up to 2 inches. For wall moulding ideas bedroom fans, pairing crisp white moulding with a pastel ceiling or a dark wood accent creates timeless elegance.
Difficulty Rating & Requirements
Overall Difficulty Rating: Medium
This project is rated as medium difficulty. It’s suitable for those with some DIY experience but can be tackled by motivated beginners as well. A willingness to learn and a steady hand are essential, especially when working with tools and materials.
Time Estimate: ⏱ Estimated time: 4-7 days
– Planning and Design: 1-2 days for sketching ideas and choosing styles.
– Shopping for Materials: 1 day for selecting and purchasing all necessary items.
– Installation: 2-4 days depending on the complexity of the moulding style chosen.
Skill Requirements:
– Required skills: Basic carpentry, measuring, cutting, and painting skills.
– Beginner-friendly: Yes, with the right guidance. Beginners can learn essential skills through online tutorials or local workshops.
– Skills like precise measuring and cutting can be learned easily, while using power tools may require some practice.
Tools & Materials Needed: 🧰 Essential items checklist
– Measuring tape: Required for accurate measurements.
– Miter saw: Required for cutting moulding at precise angles.
– Nail gun or hammer: Required for attaching moulding to walls.
– Level: Required to ensure moulding is straight.
– Caulk: Optional for filling gaps between moulding and walls for a smooth finish.
– Paint or stain: Optional, depending on your design choice.
– Safety goggles: Required for protection while using power tools.
– Stud finder: Optional for locating wall studs, especially for heavier moulding.
Step-by-Step Overview:
1. Planning and Designing (1-2 days): Start by sketching your ideas and deciding on the style of moulding you want for your bedroom. Research different wall moulding ideas and visualize how they will complement your space.
2. Shopping for Materials (1 day): Visit local home improvement stores or shop online to gather all your materials. Make sure to buy enough moulding for your specific measurements.
3. Installation (2-4 days): Measure and cut your moulding pieces accurately. Use a level to ensure everything is straight. Attach the moulding with a nail gun or hammer, and caulk any gaps for a clean look.
4. Finishing (optional, 1 day): Paint or stain your moulding if desired. Allow it to dry completely before moving furniture back into place.
Professional vs DIY:
Hiring a professional can cost between $1,000 to $3,000 depending on the complexity of your design and size of the room. DIY projects typically cost around $200 to $800 for materials alone. If you have a good eye for detail and enjoy hands-on projects, consider going the DIY route. If you’re uncomfortable with tools or want a flawless finish, hiring a professional might be best.
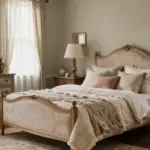
2. Wainscoting for Depth

Wainscoting is a delightful way to add visual depth and character to your bedroom. This paneling technique typically adorns the lower third of your walls, creating a textured and inviting atmosphere. Imagine a soft gray wainscoting paired with crisp white upper walls, or deep navy panels meeting warm wood tones above, crafting a cozy yet sophisticated environment. The layered look of wainscoting naturally draws the eye, enriching your space’s overall appeal.
When implementing wainscoting, consider styles like beadboard or raised panels based on your desired aesthetic. A striking two-tone effect can be achieved by painting the wainscoting a different hue than the upper walls, offering a stunning contrast. If you’re handy, this is a fantastic DIY opportunity, but for an impeccable finish, professional installation can be beneficial.
Here are some ideas for incorporating wainscoting:
– Choose beadboard for a classic, cottage-inspired look
– Paint the wainscoting in a bold color to make a statement
– Use contrasting trim to highlight your design
– Pair with vintage wallpaper for a charming accent
Wainscoting adds not only style but also a sense of warmth through its rich textures and finishes, enhancing the overall atmosphere of your bedroom.
Wainscoting for Depth
Editor’s Choice


3. Picture Moulding for Art Display

Picture moulding is an ideal solution for art lovers seeking to elevate their bedroom’s charm. This elegant moulding creates a perfect ledge for showcasing art and photographs without damaging your walls, allowing for a personalized touch in your decor. Picture a serene bedroom where curated art pieces hang gracefully at eye level, framed beautifully by the moulding itself, creating an inviting gallery feel.
The versatility of picture moulding means you can switch out your displayed art, keeping your decor fresh and inspiring. You might consider grouping similar frame styles for a cohesive look or mixing and matching for an eclectic vibe. Adding further layers, like additional wall trim, can enhance the visual interest and depth of your space.
To maximize your picture moulding’s potential, try these suggestions:
– Hang a variety of art styles for a dynamic display
– Incorporate small sconces to illuminate key pieces
– Use larger frames to create a bold statement
– Coordinate colors of frames with your room’s palette
By incorporating picture moulding, you not only introduce a refined element but also create an engaging focal point that invites appreciation for the artistry within your bedroom.
Picture Moulding for Art Display
Editor’s Choice


4. Board and Batten

Board and batten offers a delightful way to infuse texture and interest into your bedroom walls. This technique, which alternates between wide boards and narrow battens, creates a visually appealing striped effect that draws attention. Imagine a tranquil bedroom with soft earth tones, where the board and batten design adds a rustic yet modern charm, seamlessly integrating into your decor style.
When using board and batten, consider painting the panels in contrasting colors for a dynamic finish or opting for classic white for a timeless look. This technique works beautifully with other design elements, such as wainscoting, to create layered visual intrigue. It can also help visually elongate walls in smaller spaces, making them appear taller and more inviting.
Explore these ideas for your board and batten installation:
– Paint contrasting colors for added visual interest
– Use reclaimed wood for a rustic, eco-friendly choice
– Ensure even spacing with a level for a polished finish
– Mix with other moulding styles for depth
This charming technique enhances your bedroom’s overall aesthetic while introducing warmth through its rich textures and materials.
Board and Batten
Editor’s Choice


5. Coffered Ceilings

For those aiming to make a striking statement, coffered ceilings are an excellent choice. This design features a series of recessed panels arranged in a grid, adding depth and visual intrigue that can truly transform your bedroom. Imagine walking into a room where the ceiling design captures your attention, framed by elegant fixtures that enhance the luxurious feel of the space.
While coffered ceilings often require professional installation, the aesthetic rewards are immense. Pair them with decorative chandeliers or pendant lights to highlight the craftsmanship and create a warm ambiance. This style complements both traditional and modern interiors, making it a versatile choice for any home.
Consider these tips when planning your coffered ceiling:
– Integrate lighting within the grid for a stunning effect
– Choose soft colors to maintain a spacious feel
– Use contrasting colors to emphasize the panels
– Opt for wider grids in larger rooms
Coffered ceilings not only elevate the room’s design but also enhance the overall atmosphere, creating a cozy and inviting environment through the interplay of textures and materials.
6. Chair Rail Moulding

Chair rail moulding is a practical yet stylish addition to your bedroom, serving as a barrier at chair-back height that protects walls while adding a touch of sophistication. This subtle design feature can help break up wall space, making it easier to incorporate various colors or wallpapers without overwhelming the room’s aesthetics. Imagine a serene bedroom where the chair rail elegantly divides a soft, neutral lower wall from a vibrant upper section, creating a harmonious balance.
To maximize the impact of chair rail moulding, consider painting the lower wall in a darker shade than the upper section, enhancing the visual divide. This moulding also serves as an ideal spot for hanging art or family photos, enriching your decor without causing damage to your walls.
Explore these installation tips for chair rail moulding:
– Use a miter saw for clean, precise cuts
– Choose colors that harmonize with your overall design
– Ensure consistent height around the room for a polished look
– Plan furniture placement to avoid awkward gaps
By incorporating chair rail moulding, you not only enhance the room’s style but also introduce a sophisticated element that adds depth and character to your bedroom.
7. Simple Beadboard

Beadboard is a timeless choice for adding a vintage touch to your bedroom, particularly effective in coastal or cottage designs. This charming style features narrow, vertical boards often painted in soft colors or classic white, creating an airy and light-filled ambiance. Visualize a cozy bedroom where beadboard wainscoting meets pastel walls, evoking a sense of calm and tranquility in your space.
You can use beadboard on full walls, as wainscoting, or just as an accent to suit your style. Pair it with beach-inspired decor, such as nautical stripes and light fabrics, for a cohesive and inviting look. Beadboard is also a fantastic DIY project, making it accessible for those eager to enhance their living space.
Consider these tips for beadboard installation:
– Pre-drill holes to prevent splitting the wood
– Use adhesive for added stability
– Paint in colors that complement your decor
– Ensure even spacing for a professional appearance
By utilizing beadboard, you introduce a delightful element that enriches your bedroom’s character while enhancing the overall aesthetic with its classic charm.
8. Intricate Cornice Moulding

For those seeking to infuse drama and flair into their interiors, intricate cornice moulding is a captivating choice. This decorative option adorns the intersection of walls and ceilings, often featuring elaborate designs that elevate the sophistication of any bedroom. Picture a stunning room where ornate cornices frame a soft, painted ceiling, creating an atmosphere of luxury and elegance that draws the eye upwards.
Intricate cornice moulding enhances architectural details and can be customized in various styles, from traditional rosettes to contemporary geometric shapes. Whether painted or left in a natural finish, this moulding introduces a timeless charm that complements both classic and modern decor.
Explore these tips for incorporating cornice moulding:
– Use contrasting colors to highlight the ornate details
– Ensure proper installation to prevent sagging
– Pair with statement light fixtures for added impact
– Consider the scale of your room for appropriate design choices
By integrating intricate cornice moulding, you not only enhance the elegance of your bedroom but also create a polished and intentional atmosphere through its beautiful textures and materials.
Intricate Cornice Moulding
Editor’s Choice


9. Elegant Arched Moulding

Arched moulding introduces a unique and soft touch to your bedroom, fostering a warm and inviting atmosphere. This style frames doorways, windows, or sections of walls with gentle curves, creating an elegant transition that softens the lines of the room. Imagine a dreamy space where arched moulding seamlessly enhances the natural light streaming through soft, sheer curtains, evoking a sense of calm and relaxation.
This moulding’s subtle architectural interest adds character without overwhelming the room’s design. Arched moulding works exceptionally well with soft fabrics and light colors, reinforcing the overall ambiance of tranquility in your bedroom.
Consider these installation tips for arched moulding:
– Measure accurately for symmetry and balance
– Use flexible materials for perfect curves
– Coordinate colors with your overall decor scheme
– Add decorative elements like sconces for extra charm
By incorporating arched moulding, you create a flowing, cohesive look that enhances your space’s overall beauty while inviting warmth through its gentle contours and textures.
Elegant arched moulding adds a warm, inviting touch to your bedroom, framing doorways with soft curves. Pair it with sheer curtains and luminous walls to let natural light filter through. This wall moulding ideas bedroom approach brings calm, enduring elegance.
Elegant Arched Moulding
Editor’s Choice


10. Decorative Baseboards

Decorative baseboards play a crucial role in bedroom decor, providing a polished finish at the junction between walls and floors. With a variety of styles and heights available, you can select baseboards that perfectly complement your overall design aesthetic. Imagine tall, ornate baseboards in a grand bedroom or sleek, minimalist ones in a contemporary space, both creating a sense of cohesion and style.
Investing in decorative baseboards not only protects your walls from scuffs and damage but also enhances the room’s overall appeal. Opt for taller options in larger rooms to create a sense of grandeur, while classic styles work beautifully in more intimate spaces. Painted baseboards in contrasting hues can also make a striking statement, further enriching your decor.
Explore these tips for choosing decorative baseboards:
– Maintain a consistent color scheme throughout the room
– Opt for semi-gloss finishes for easy cleaning
– Pair with other moulding styles for added depth
– Consider the scale of the room for appropriate height
By incorporating decorative baseboards, you provide a finishing touch that elevates your bedroom’s design while introducing warmth and continuity through carefully chosen materials.
11. Layered Moulding Designs

Layering different types of moulding can create a stunning and unique aesthetic in your bedroom. By blending various styles, you can add depth, texture, and character to your space, resulting in a truly personalized design. Picture a room where crown moulding meets wainscoting and picture frames, creating a rich tapestry of detail that invites admiration.
The beauty of layered designs lies in their ability to reflect your personal style while mixing traditional elements with modern flair. Consider using crown moulding at the ceiling, wainscoting on lower walls, and picture moulding at eye level for a beautifully textured wall. This approach works especially well in larger bedrooms, where the added complexity can enhance the overall design.
Here are some tips for successful layered moulding:
– Keep color schemes consistent to maintain balance
– Select moulding styles that complement rather than clash
– Vary the widths of moulding for added interest
– Layer textures to create a tactile experience
By embracing layered moulding designs, you enrich your bedroom’s aesthetic, creating a space that truly reflects your personality while enhancing its visual appeal.
Layered moulding designs turn wall moulding ideas for the bedroom into a tangible, stylish statement. Start with crown, add wainscoting, and finish with framed panels—mix traditional lines with modern flair for a space that feels uniquely yours.
12. DIY Moulding Projects

For the creatively inclined, DIY moulding projects can offer a fantastic opportunity to personalize your bedroom. From simple trims to intricate designs, there’s a moulding project suitable for every skill level. Imagine transforming your space with your own hands, whether adding a classic chair rail or crafting a stunning coffered ceiling.
DIY moulding projects are budget-friendly and allow for customized designs that fit your personal style. Completing these projects can also bring a sense of accomplishment, making your space truly your own. Start small with simple installations, then progress to more complex designs as your confidence grows.
Explore these tips for successful DIY moulding:
– Choose easy-to-work-with materials like MDF or polystyrene
– Invest in a quality miter saw for accurate cuts
– Follow online tutorials for step-by-step guidance
– Plan your project carefully to avoid mistakes
By embracing DIY moulding projects, you can create a bedroom that reflects your creativity and style, enhancing the overall design with personal touches that bring warmth and individuality.
Conclusion

Incorporating wall moulding into your bedroom can transform the space into a stylish sanctuary filled with character and charm. Whether you opt for traditional crown moulding, modern wainscoting, or even a DIY project, the possibilities are endless.
Each of these twelve ideas showcases how a simple detail can elevate your bedroom’s elegance while expressing your personal style. So go ahead, explore these options, and consider which ones resonate with you the most. Your dream bedroom awaits!
Note: We aim to provide accurate product links, but some may occasionally expire or become unavailable. If this happens, please search directly on Amazon for the product or a suitable alternative.
This post contains Amazon affiliate links, meaning we may earn a small commission if you purchase through our links, at no extra cost to you.
Frequently Asked Questions
What are the best wall moulding ideas for a classic bedroom?
For a timeless, classic bedroom, start with 1-2 statement mouldings and keep the rest simple. Try a raised panel or beadboard wainscoting paired with a slim picture rail to define the wall. A chair rail around the mid-wall height adds architectural rhythm and protects finishes. Repeat the same moulding height around windows or behind the bed for balance. These wall moulding ideas bedroom bring classic detail without feeling busy.
How do I choose interior molding styles that fit a vintage-inspired bedroom?
Begin with era-based inspiration (Georgian, Victorian, Art Deco) and match scale to your room. In smaller spaces, choose slim profiles: a simple picture rail, narrow beadboard, or shallow paneling to keep the room airy. If ceilings are tall, go bolder with higher panels or crown moulding; if ceilings are low, stay pared back to maintain proportion. Consider accents like a floral rosette or a subtle ceiling medallion sparingly to keep the vintage vibe cohesive. This helps ensure the wall moulding ideas bedroom read as intentional old-world charm.
Can I DIY wall moulding in a small bedroom without it feeling crowded?
Absolutely. Start with a clear plan and measured layout to avoid crowding. Use lightweight options like polystyrene or MDF trim, then secure with clear adhesive and finishing nails. Cut precisely with a miter box, fill gaps with caulk, and paint in a single, light color to keep the room airy. Keep the moulding height around 6–8 inches for a subtle but elegant effect, or go lower if the ceiling is low. With careful spacing, DIY wall moulding can transform a small bedroom without overwhelming it.
What are affordable wall trim designs that still feel luxurious for classic bedroom decor?
You don’t need solid wood to get luxury. Try beadboard panels, lightweight polystyrene trims, or MDF rail and casing combined with a crisp paint finish. A slim cap strip and a shallow chair rail can offer classic rhythm at a fraction of the cost. Paint samples first to see how the tone interacts with your bedroom design ideas and color palette. This approach gives you bedroom design ideas and classic bedroom decor without breaking the bank.
How do wall moulding ideas affect lighting and room balance in a bedroom?
Moulding can sculpt light and frame architectural features. Light-colored mouldings reflect more ambient light and visually raise ceilings, while darker tones add depth and coziness. Position mouldings at the right height—chair rails around 36–42 inches from the floor or panel lines aligned with window sills—to create balanced walls. Pair with ambient lighting and ceiling fixtures to avoid harsh shadows. In short, thoughtful wall moulding ideas bedroom help elevate classic bedroom decor and improve room proportion, not just ornament.